October 31, 2006

Imitation is a Form of Flattery, Right?

Photobucket - Video and Image Hosting

I love looking through the food blogs, finding inspiration for new ideas and different takes on well known dishes. I like Slashfood because at a quick glance I get a variety of foodie topics. Recently there was a picture of a rolled, stuffed steak that caught my eye. At the time I didn’t actually follow the link to the original post, but made a mental note that it was something I should look into further. Then a few days ago Dad said he wanted to do something different with steak for dinner and left it up to me to figure out what that would be. I had a picture of rolled steak flash before me. I remembered that the one I saw on Slashfood had roasted peppers in it, but that was all I remembered. I figured I could just stuff my steak with whatever I wanted/whatever I had.

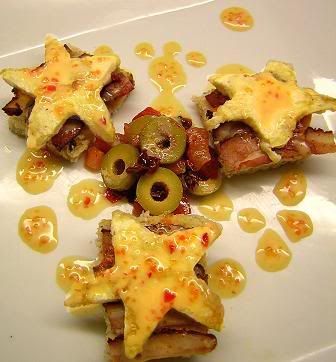
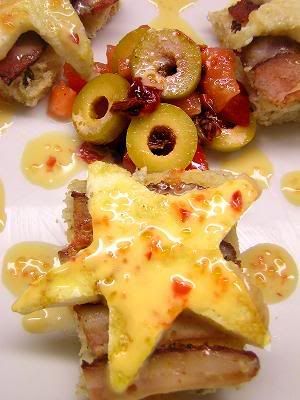
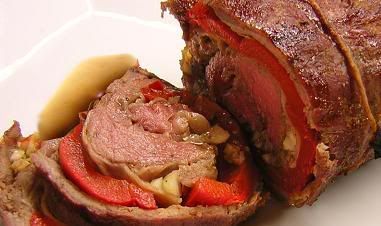
What I happened to have was some extra proscuitto, (I thought this was especially clever of me to add) garlic, a Spanish onion, a red pepper and hot pepper jelly. As an added bonus the red pepper was actually already roasting in the oven. I was originally going to use it in my weekly squash soup but decided it would be better in the steak. So I pounded out the steak until it was nice and thin and then layered it with proscuitto, roasted red pepper, minced garlic, chopped onion, a few spoonfuls of hot pepper jelly (mmm sweet with heat, in a good way) and a dash of Chinese 5 spice. Once the steak was rolled up I rubbed the whole thing with Magic Dust (from the July issue of Bon Appetit, I make up a big batch and use it on everything). Then I passed it off to Dad to finish on the BBQ.

Photobucket - Video and Image Hosting

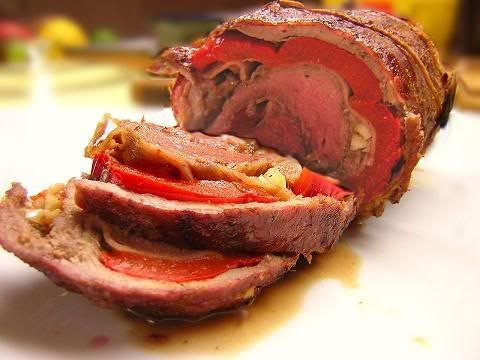
It was really good and I had immediate requests to make it again. I thought at this point that I should check out the original post of the rolled steak that I had seen on Slashfood to get some ideas for next time. The original post was by Rachael of Fresh Approach Cooking and as I clicked onto her site I realized that what I had thought was so clever of me (adding the proscuitto) was actually not my idea at all. Rachael’s dish is entitled Proscuitto and Roasted Pepper Stuffed Flank Steak. Clearly I stole the whole thing from her. Her post is great too, it’s about how much more fun foods are when they’re rolled. I whole-heartedly agree. I suggest you go have a look at her recipe, it’s more detailed than mine, (there are actually quite a few differences once you get past the main three ingredients) and her picture is tasty. She also does hers in the oven as opposed to on the BBQ. Thanks for the creation Rachael, my family is thrilled with the new dish.

I’d like to finish off with a public service announcement: Back up your computer! I nearly had a fit this morning when my computer shut itself off and refused to come back on. All is well now and I’m in the process of copying everything to a second hard drive.

Technorati Tags:
+ + +

October 30, 2006

And After the Party It’s the After Party

Photobucket - Video and Image Hosting

After organizing 113 entries for World Bread Day on October 16th, you would think that Zorra of Kochtopf would want to take a break. Instead, she’s hosting an After Party and encouraging bloggers to choose a bread recipe from the original 113 to recreate in their own kitchen. The round up for World Bread Day can be seen here and you don’t have to have participated the first time to join in on the bread baking and the After Party. So if you missed it the first time, I’d like to refer you to Rule #76: No excuses, play like a champion.

My relationship with bread making is a bit love/hate. I love to make bread but it hates to be made by me. The problem is the rising process, or lack thereof. I don’t have a firm grasp, (or perhaps any grasp) on how yeast works and why sometimes my bread rises nicely and others times it’s as dense as a brick. I was thrilled and amazed when my Honey Whole Wheat loaf for World Bread Day not only rose, but actually burst through the top. Those occurrences, however, are few and far between. Despite my bread woes, I keep naively trucking along, hoping that divine intervention will fix my bread problems without my having to actually investigate what’s wrong. With that in mind I set out to pick another bloggers’ bread recipe to recreate. I had a few criteria for what kind of recipe I was going to make. I didn’t feel like making anything sweet so that eliminated a whole bunch of entries immediately. I also didn’t want to go out and buy any new flour. I have bread, all purpose and whole wheat flour and I don’t have room in my cupboards to house anymore. Lastly, with entries from all over the world, I preferred the recipe to be in English, just a convenience thing… The blog that I chose my recipe from was Zinfully Delicious which actually had two entries to World Bread Day. The first was Bruno’s Twisted Oat Raisin bread, the second was Duane’s Old Fashioned Cinnamon Swirl loaf. Duane’s loaf, though it looks delicious, did not meet the criteria of not being sweet and so I was on my way to making a Twisted Oat Raisin bread.

Photobucket - Video and Image Hosting

Bruno made two loaves from this recipe, but as I’ve mentioned, I have bread difficulties. I ended up making one loaf, (using the whole recipe). To jazz up the fact that I only had one loaf I decided that instead of a normal three strand braid, I would make a six strand braid. It didn’t seem to be an issue that I don’t know how to do six strand braids. After fiddling with six strands for a while, I gave up, made two three strand braids and stuck them together. As usual, my bread did not rise properly and turned out dense. This is by no means a consequence of the recipe, I’m sure normal people could recreate Bruno’s recipe without a hitch. The taste is good, mine is just dense. I’m used to that by now. One day I will learn to make bread properly and when that day comes I will re-recreate Bruno’s Twisted Oat Raisin loaf and do it justice.


Technorati Tags:
+ + + > +

October 29, 2006

Don’t Try This At Home

Photobucket - Video and Image Hosting

Despite its interesting appearance I would not recommend that you re-create this dish, at least not exactly. It seemed like a good idea at the time, but the result was definitely not what I was going for taste wise. This whole thing got started when I heard that the theme for this round of Weekend Breakfast Blogging was ‘A Twist in the Plate.’ WBB#6 is being hosted by Saffron Trail and her instructions were to take any popular recipe either from a recipe book, internet recipe resource or a fellow blogger's recipe and do your own twist on it. I decided to stick to the basics and reinvent plain old bacon, eggs and toast.

Perhaps I should have left them as they were. There’s nothing wrong with bacon and eggs, they’re tasty, what I created was not. It could have been good though, it has potential, there was just one small problem, nix that, BIG problem. As I pondered how I could have turned bacon and eggs into something so awful I started breaking down the dish into its individual components to try to figure out where I went wrong. Eggs, cheese and milk? Good. Chipotle pepper and rosemary? Good. Multi-grain toast? Good. Olives? Good. Tomato and sundried tomato? Good. Bacon? Goooooood. Red pepper jelly? Good. Orange juice? Good. Mustard powder? Usually good. So what was the problem? Ah yes, there was one more ingredient: mayonnaise. BAD! I have come to the conclusion that I don’t really like mayonnaise and I especially don’t like the combination of mayonnaise, red pepper jelly, orange juice and mustard powder. VERY BAD! The mayo sauce was like e-coli, tainting everything it touched, which unfortunately, was everything and it therefore rendered the entire dish inedible. The stars were pretty, the plate was colourful, it looked alright, but it most certainly was not. After one bite I was starting to regret my breakfast decision. After two bites (hey, I had to give it the benefit of the doubt) I started to get a bit of a gag reflex. As I watched the third bite approach my lips I knew I couldn’t do it. I dropped my fork and with a heaven heart and an upset stomach I dumped the rest of the plate in the garbage. I then had a bowl of cereal for breakfast. I still feel like I can taste the dreadful mayonnaise.

Photobucket - Video and Image Hosting

For anyone who would like to redo this recipe without my awful mayonnaise sauce, I suggest creating a hollandaise sauce instead. I realize that the two are quite similar but I would say that mayonnaise and hollandaise are like a set of twins. They look the same but one is evil and one is good. Mayonnaise alone though did not ruin this sauce. You’re probably wondering what possessed me to mix together mayonnaise, mustard powder, orange juice and red pepper jelly. Fair enough. I had glanced at a Bon Appetit recipe a while ago for mock hollandaise, and it contained the first three ingredients. How could Bon Appetit have led me astray? Upon closer inspection (about 2 minutes ago) of the mock hollandaise recipe I noted that the mustard was in fact Dijon and not powdered and that the recipe also called for grated orange peel and lemon juice. Those changes probably made a big difference, it needed the lemon juice. So I guess my inability to read recipes was part of the problem, the other part was the addition of red pepper jelly. In most cases I like the sweet with heat taste that the jelly adds. In this case however, the lack of lemon juice and the addition of red pepper jelly made for a cloyingly sweet (and disgusting) sauce. My stomach is still churning just thinking about it. Blech.

This disaster dish is not helping my “Bringing Breakfast Back” cause, but I’m sure the other entries into the 6th round of Weekend Breakfast Blogging are better. You’ll have to go check them out at Saffron Trail.


Technorati Tags:
+ + +

Shameless Self Promotion

Blog Of The Day Awards Winner

I never expected this in a million year, (pause as I remove a computer typed list from the cleavage of my expensive designer dress). I'd like to thank the academy- everyone who created this night, Mom and Dad- you've always supported me, my cat Kishu- she sleeps a lot and I'd like to think that this is her way of encouraging me, snow- for giving me a reason to stay inside in the kitchen, God- he always seems to get thanked in these situations, my KitchenAid Wilbur- although he didn't help me make the sushi that won the award he was there cheering me on the whole way, but most importantly I'd like to thank the fans- without you I never could have made it this far. Thank you! Goodnight everyone, drive safe!

Seriously though- thanks to Artizen Flair of artizenkitschen for the nomination for my sushi post, it was very fun to receive an email saying I'd won something!


Technorati Tags:
+ +

October 28, 2006

I’ll Huff and I’ll Puff and I’ll Blow Your Soufflé Down

Photobucket - Video and Image Hosting

Since I’ve got an abundance of squash in my garden, (or rather my fruit cellar as I had to rescue them before they were hit by frost) I’ve been making butternut squash soup every week. Recently Artizen Flair of artizenkitschen had a post about an amazing Garam Masala Pumpkin soup that was so good it left her neighbours begging her to make some for them. With a review like that, I knew what I would be doing for my weekly squash soup, in went the garam masasla. I loved it! Garam masala is a spice that I seem to have lost touch with, but no worries, we’re together again. A little info for those of you who may not be so close with my new friend: Garam masala is a blend of ground spices common in Indian cuisine, whose literal meaning is 'hot (or warm) spice'. There are many variants: most traditional mixes use just cinnamon, roasted cumin, cloves, nutmeg (and/or mace) and green cardamom seed or black cardamom pods. Many commercial mixtures may include more of other less expensive spices and may contain dried red chili peppers, dried garlic, ginger powder, sesame, mustard seeds, turmeric, coriander, bay leaves, cumin, and fennel. Garam masala can be used during cooking, but unlike many spices, it is often added at the end of cooking, so that the full aroma is not lost. Garam masala is not "hot" in the sense that chilis are, but is fairly pungent. Thank you Wikipedia.

Now then, Habeas Brûlée is hosting the 8th round of The Spice is Right event, originally started by Barbara of Tigers and Strawberries. This month the theme is Frankenstein’s Monster which means we’re being asked to make a dish using a spice (or blend of spices) with a technique or dish from a cuisine that typically never uses that spice (or blend). Well the wheels started turning in my brain, (squeaky yes, but they were turning) and I knew that this would be a perfect opportunity to incorporate garam masala into something. For quite some time now I’ve wanted to make a soufflé. Be it savoury or sweet, I didn’t really care, I just wanted to make a soufflé because they look pretty cool and I’ve never made one. I don’t know why I haven’t made one already, but maybe I was waiting for an opportunity like this one to come along. Don’t mistake this creation lag for laziness; I’m like a tiger waiting to pounce at just the right moment. When the prey was spotted I went in for the kill. I would make a garam masala soufflé. Oooh the genius of it all!

Photobucket - Video and Image Hosting

I wasn’t sure how this would turn out, but I knew I would like it regardless because I was dumping in a whole lot of garam masala. With that in mind I opted to make myself an individual portion using a recipe for a cheese soufflé from an old Canadian Living Cookbook. I followed their recipe exactly (except I cut it to one serving size) and then added my garam masala. I was thrilled with the results! In fact, I’m not going to lie, I was a little giddy when I saw my soufflé rising up to almost twice the size of the ramekin that was attempting to contain it. But I have heard many stories of falling soufflés and was nervous about taking it out of the oven. As soon as I did I reached for the camera right away and tried to capture the soufflé in its full glory, but I don’t think I quite did, (notice the second picture is higher than the first, but still not as high as it was). My soufflé fell, but no so far as to be un-souffléed, (it’s a word, I say so). The Canadian Living Cookbook tells me to expect my soufflé to fall, and they recommend seating dinner party guests before the soufflés are finished so that they receive them before the harsh world outside of the oven starts the deflating process. I was impressed with my soufflés either way and since garam masala is not a traditional spice used in soufflés, there you have my creation for Frankenstein’s Monster.

Masalalicious Cheese Soufflé (Adapted from “Rose Murray’s Cheese Soufflé in The Canadian Living Cookbook)

¾ T butter
¾ T all purpose flour
¼ cup hot milk
1 egg yolk
2 egg whites
¼ tsp cream of tartar
¼ cup grated cheddar cheese
Salt + pepper
Garam masala, the more the better… I probably put in a couple teaspoons, I didn’t measure.
A sprinkle of cayenne

Preheat oven to 400°F and grease one ramekin.
Melt butter over medium heat in saucepan. Add flour and cook, stirring over low heat for 1-2 minutes. Do not brown. Remove from heat and gradually pour in hot milk, whisking vigorously until blended and smooth.
Whisk in spices. Return to heat and boil, whisking constantly until smooth and thickened. Let simmer for 1 minute, remove from heat and beat in egg yolk, whisking thoroughly. Set aside.
Beat egg whites until foamy and then add cream of tartar. Continue beating until stiff but not dry. Stir large spoonfuls of beaten egg whites into the sauce to light it, stir in all but 1 T of cheese. With spatula, lightly fold in remaining egg whites, do not overfold.
Spoon mixture into your ramekin, smooth the surface and sprinkle remaining cheese on top.
Place in preheated oven and reduce heart to 375°F. Bake for about 22 minutes and don’t open the door before 20 min. When finished it should be golden brown on top and a knife inserted in side of puff should come out clean. Makes 1 serving.


Technorati Tags:
+ + + +

Roll, Cut, Serve

Photobucket - Video and Image Hosting

I was recently invited to a Japanese themed dinner party and was asked if I could bring sushi rolls as an appetizer. I’m always happy to oblige, especially for this hostess as her dinners are always over the top delicious. I would have loved to be able to bring her some sashimi as well as rolled sushi, but you just can’t get high quality, fresh seafood where I’m living right now, so that wasn’t an option. My rolls ended up being various combinations of the following: rice, crab, mango, cucumber, carrot, pickled asparagus, ginger and wasabi. I usually start out making specific types of rolls, but then forget ingredients. I know this hardly seems possible, all of my ingredients are sitting right in front of me. My mise en place is always in order but my brain is not. These things happen.

Photobucket - Video and Image Hosting

I definitely should have had my camera with me at the dinner, but I feel weird about snapping pictures of everything I eat when I’m with a group of people I don’t know. It’s easier for everyone involved when I can just be sneaky and take pictures in the kitchen on my own. But let me try to tell you how great everything was. The hostess had prepared multiple courses that began with my sushi appetizers as well as tempura shrimp. After the appetizers we had a lovely miso soup. Next up was a cold savoury custard with mushrooms, seafood and chicken, I forget what it was called but there was some story behind it about having element from land, sea and air. Somehow the chicken counted as being from the air… don’t ask me. As for the custard, the variety of textures and flavours was really unusual but in the best possible way. The main course was something new for me too, I’d eaten all of the components before, just not together. On the table were two big electric frying pans into which we put chicken and browned it and then added a mixture of sake, sugar and soy sauce. After the liquid we added a whole lot of extras: sweet potato, zucchini, mushrooms, tofu, noodles, spinach, (the non-tainted variety) and let everything come to a simmer. Each person had a bowl with a whole egg in front of them and some rice. We cracked our eggs open and then everyone used their chopsticks to take what they wanted from the pan, dipped it into the egg and then mixed it with rice. The hot food coming out of the pan heated the thin layer of egg that coated it and it was really tasty. The pots were refilled twice so everyone definitely had their fill. But the night wasn’t over just yet. To finish off lightly after so much food we had a simple mango custard with fresh clementine slices on top. We also had sake and Japanese beer throughout the meal. Everything was excellent and there was an interesting mix of people which made for some good conversation. All in all a very enjoyable evening except that I was so stuffed by the end of it I thought I’d have to be rolled home.

Photobucket - Video and Image Hosting


Technorati Tags:
+ + +

October 26, 2006

I Will Call Them Mini Me... Err, Mini-Cheesecake

Photobucket - Video and Image Hosting

The theme for the 24th Sugar High Friday is Little Bites of Delight and is being hosted by Cook Sister!. There are various names for these tiny edibles; petits fours, mignardises or friandises, but no matter what you call them they all taste and look great! When I first heard what the theme was my mind immediately went to France and the white box tied with a ribbon. Each week the sweetest Grandmother ever would bring over a plain white box, tied shut with a shiny white ribbon. It was from the local bakery and filled with the best petit fours I’ve ever tasted. There were little meringues, florentines, chocolate ‘cigars’, I can almost taste them. I thought these would be perfect for SHF, but the more I thought about it, the less I wanted to make them. Nothing I could produce would live up to the memory of the petit fours in the white box. And so I abandoned that idea and sort of forgot about SHF for a while.

Photobucket - Video and Image Hosting

Fast forward to today when I realized that the deadline for SHF is tomorrow, I hadn’t made anything and I’m going out of town tonight. I made a quick decision to make some mini cheesecakes. A mini cheesecake pan is still on my ‘wish list’ so I would have to put them in mini muffin cups. When I opened the cupboard to see if I had any muffins cups I found actual petit fours cups. Where on earth did those come from? I really have no clue, but I was glad they were there, that meant my mini cheesecakes would be more in line with the one bite style of petit fours. Not only did I have authentic petit fours cups, but there happened to be three different colours of cups so I thought I’d make a different kind of cheesecake to go inside each colour. To make things easier on myself all of the cheese cake would have a graham cracker base, (graham cracker, butter, sugar). I started by making plain cheesecake (just cream cheese, eggs, sugar and vanilla) and then separated it into 3 bowls where I added chocolate, strawberry jam and toasted coconut, respectively. I ended up making some of the cheesecakes in mini muffins cups as well because I needed something big enough to hold my chocolate dipped strawberries. Chocolate dipped strawberries make everything better. And there you have my cheesecake petit fours, little bites of delicious for Sugar High Friday.

Photobucket - Video and Image Hosting


Technorati Tags:
+ + + + +

You Can Take Your Toast and STUFF IT!

Photobucket - Video and Image Hosting

It’s time for more breakfast options in my “I’m Bringing Breakfast Back” series. The special today is Stuffed French Toast with Maple Compote. Compote makes it sound more sophisticated, me too. Try it, you could be sophisticated too. Let me warn you though, your sophistication will end as soon as you take your first bite of this dish. After that etiquette falls away and instinct takes over. Do whatever you have to do to get the contents of the plate into your mouth. Forks are cumbersome, use your hands. I hope you aren’t wearing white. Your clothes aren’t important right now, don’t think about them, concentrate on the plate. Indulge. You know you want to. Once you’ve licked the plate clean, rest. It’s been an intense morning.

I’m sure you’d like to know more about a French toast that could inspire such a frenzy. Let me tell you about it. I began, (and you could too) by slicing an extra thick piece of good bread. Then I cut into the middle, making a pocket. Into this pocket I spread cream cheese and strawberry jam, (the latter was homemade, of course) and gently closed the pocket. I then dipped the bread into a mixture of egg and milk, coating it entirely. Once I had a wet surface I covered the bread with large flake oats. And then into a buttered pan it went, to brown lightly on both sides. When it was sufficiently toasty, I slid it onto a plate. But I wasn’t done yet, oh no! I’m a multi-tasker and while my toast was browning, I was also making a lovely maple compote to pour on top. In a tiny sauce pan I heated and reduced some raspberries, blueberries and maple syrup, making a sweet, thick and fruity sauce. Then it was time to pour the sauce on top of my stuffed French toast. I then took a moment to enjoy my masterpiece, (and take a picture for your benefit) and dove in.

If you want an official recipe, you can visit Chef at Home, he calls his Fortune French Toast. Mine uses jam instead of marmalade in the stuffing and I like a multi-fruit compote instead of just blueberries. Stuffed French Toast is a breakfast that’s guaranteed to get you out of any trouble you may have gotten yourself into. Serve it, and all your wrong doings will be forgotten.

Photobucket - Video and Image Hosting


Technorati Tags:
+ + + +

October 24, 2006

“I Don’t Know What You Came To Do Girl, But I Came To Party”

Photobucket - Video and Image Hosting

Clearly, an explication is needed. The Amateur Gourmet is hosting an amusing contest. He has asked people to design a dish that fits the description “Female on a Plate.” How exactly did he come up with this contest? Well, it all started when New York Magazine asked Usher:
“What kind of dish would you like to inspire?”
Usher’s reply was:
“Female on a Plate. It would be any kind of dessert I eat--chocolate cake, banana pudding. They have Sex on The Beach. Why Can't I have Female on a Plate?"

The rules are simple: Design a dish that fits the description “Female on a Plate.” You can be as literal as you want to be, you can take the high road or the low road as long as the road leads to “Female on a Plate.” Readers will vote for their favourite, (please do!).

Personally, I thought this was hilarious. However, from the comment section on Amateur Gourmet it seems as though quite a few people were offended by Usher’s statement and the subsequent contest to fulfill his wishes. Feminism, schememinism! This is funny people! Usher isn’t going to be offended if you think he’s sexist, in fact, he’ll never even know. The only people who are hurt by this statement are the ones who get themselves all worked up over nothing. Why should I get mad at something so trivial? Especially when it’s so funny…

Photobucket - Video and Image Hosting

When I decided to enter, (which was immediately upon hearing about the contest) I wanted to make two submissions. I highly doubted that Usher has a problem getting any kind of “Female on a Plate” that he wants, (interpret that however you’d like) but I wanted to give him a little choice. Based on Usher’s comment that he likes banana pudding and chocolate cake, I planned to incorporate variations of both of these into my dish. I could picture what it should look like so clearly. The end result was supposed to be a brownie tower that had been hollowed out and filled with puréed caramelized bananas and rum. The tower was then to be covered with a shiny white meringue style icing, drizzled with caramel and chocolate sauce and topped with spun sugar. Voilà! Female on a Plate.

You have probably noticed that there is not a picture of this. That is because although I had all of the components described above, I failed HORRIBLY at putting them together and it ended up being a plate of brownish/yellowish mush. Not a female. I then tried to reinvent my dish by freezing some of the mush and then turning it out onto a plate in a dome shape. I tinted some of the extra icing pink and covered the dome and then wanted to put strawberries around the base with a chocolate drizzle. Part way into doing this, the frozen dome forgot that it was supposed to be frozen and everything melted together into a decidely unappealing glob. Once again, not a female. Sigh. I had such high hopes for this dessert. In my head it was really going to be something amazing. Unfortunately I have nothing to show for my efforts except some added fat around my mid section, (just because it was ugly, doesn’t mean it wasn’t edible).

So now Usher doesn’t get a choice, he has to accept my second version of “Female on a Plate.” I’d like to say that I was inspired to create this dish by a friend of mine who routinely “crosses the line.” He’ll often say something so completely ridiculous that it results in 1- The conversation ending abruptly (also known as a ‘conversation killer’). 2- A lot of laughter and jokes at his expense for years to come. And 3- Somebody telling him he’s so far past the line that he can’t even see it anymore. But that’s why we love him. “Female on a Plate” definitely seems like the sort of dish that this friend would invent, and he would certainly not take the high road to get there. With that in mind, I leave you with my submission for the Amateur Gourmet’s “Female on a Plate” Contest. You always knew Barbie wasn’t as innocent as she seemed.


Technorati Tags:
+ + + +

October 23, 2006

How Hard Could It Be To Make Fluffy Sugar?

Photobucket - Video and Image Hosting

The people behind Slashfood really like candy. And who could blame them? Halloween is fast approaching and to get into the candy spirit, Slashfood is hosting a day of Candy Creations on October 24th. They’re going to talk about some of their favourite candies, homemade and store bought and offer some tips on where to find the best candies and what to give out for Halloween. Well Slashfood, I like the cut of your jib. I decided to join in on the fun by making marshmallows. For the first time.

Photobucket - Video and Image Hosting

I’ve generally shied away from making anything that requires boiling sugar to an appropriate temperature. It kind of scares me. Candy making is something I’ve always longed to do, but lacked the expertise for. Well, I didn’t suddenly gain any knowledge about candy making, but I did get Wilbur, and I figured he would make up for anything I lacked. Wilbur certainly got a workout today. He didn’t realize what he was getting into when I decided to make marshmallows. I got a recipe online, realized it was somewhat sketchy, but went ahead with it anyway. Why do I set myself up for failure? The recipe wasn’t the only problem though, it was boiling sugar that really messed things up. The recipe told me to boil the sugar mixture until it reached 240°F. My (borrowed) candy thermometer told me that this was also known as “softball” stage. I’m sure all you candy makers are well aware of this, and are well aware that when a recipe tells you to boil until softball stage, you probably shouldn’t pass it. Well I wouldn’t know softball stage from golf ball or basketball stage. This is what led to my downfall. When my thermometer seemed to read 240°F, I removed the pan from the stove and poured the contents into Wilbur’s bowl which was already holding the gelatin. I was then supposed to mix on high for 6-10 minutes until the mixture was white and tripled in volume. I was not able to get to that point. I had to rescue Wilbur by shutting him off early so that he didn’t hurt himself, (you gotta love the guy, he just tries so hard). Apparently, I had passed the “softball” stage of cooking because instead of turning white and tripling in volume, my mixture turned about one quarter white, three quarters very hard golden blob. I was very successful in making rock candy which I then tried had to try to pry off of Wilbur’s paddle. This resulted in the mess you see below.

Photobucket - Video and Image Hosting

But I plowed on, determined to have something to present for Slashfood. Now then, I had some of this supposed marshmallow substance, and to it I added the entire quantity of egg whites. A smarter person would have realized that, having thrown out three quarters of the sugar mixture, I definitely wouldn’t have needed to add all of the egg whites. I did anyways. I followed the rest of the recipe as it was and poured the meager contents of my bowl into a prepared pan. I waited for at least 3 hours and up to overnight (specifically 6 hours) and then turned the marshmallows out onto a cutting board. Those extra egg whites made themselves known. But Slashfood! Onward! What do you do when your cake/brownie/ice/candy/dessert is ugly? Cover it. Same theory applies here. Whipped cream works well for birthday cakes but not so much for marshmallows. For this job, I would turn to chocolate. Chocolate could be an entry for Slashfood’s candy day all on its own, but today it would be a sideshow to the main act. Other sideshows included peanut butter, graham cracker and milk. My marshmallows were far from what they should have been and I’m still scared of boiling sugar, but it’s a start. And it wasn’t a total waste, as with every kitchen experiment I learned something new. Today I learned that it’s much easier to drive your self to the store and buy a bag of marshmallows than it is to make them at home.

Photobucket - Video and Image Hosting


Technorati Tags:
+ + + +

October 22, 2006

Who Ya Gonna Call?

Photobucket - Video and Image Hosting

Sometimes I decide to do something and half way through I wonder what possessed me to do such a thing? That may have happened today when I agreed to go on a 20km hike on a “trail” that was muddy at best and consisted largely of continuous ups and downs over slippery rocks and logs. It sure is a good thing I packed some commando cookies… Is your hike dragging on too long? Commando Cookie! Is your boss on your case? Commando Cookie! Got a 4pm hunger craving? Commando Cookie! In-laws are coming, the house is a mess and your dog just died? Commando Cookie! Commando Cookie! Commando Cookie! The commando cookie is trained to operate quickly and aggressively in especially urgent, threatening situations. It has the ability to restore energy and renew your zest for life, (or at least your taste buds). November’s issue of Bon Appetit may call them Chockablock Cookies, but Commando is definitely what they are. How else would you describe a cookie that is packed with dried cherries, apricots, cranberries, raisins, dates, pecans, cashews, almonds, coconut, oats, dark chocolate, bittersweet chocolate and reeses pieces chipits? I suppose ‘amazing’ would be another way of describing them, but I’m a fan of commando.

Photobucket - Video and Image Hosting

I think these cookies should actually be marketed to adventure junkies. What other cookie is willing to risk life and crumb, nay, enjoys risking it, to be by your side when you’re in a crisis? Just look at the little commandos, they’re deep in the wilderness, climbing over rocks and loving every minute of it! They’re ready to jump into any situation you’ve gotten yourself into, eager to save the day. They’re really the heroes of the cookie world. If adventure is your name, these cookies are your game. Commando Cookies!


Technorati Tags:
+ +

October 20, 2006

Right or Wrong I’m Still the Captain

Photobucket - Video and Image Hosting

My Husband Cooks is hosting their first blogging event called Food Blogger’s Geography. The theme is Southern Style and they’ve left that wide open to interpretation. You’re welcome to cook Southern American or South Pole cuisine, they’re flexible. I like having that freedom although often when I have to make a lot of decisions, nothing gets done. I just sit and read cookbooks and look at recipes for hours on end. That would also be the reason why I’m entering my submission on the day of the deadline, I actually thought it was yesterday and I had missed it, but nope! Anyways, my decision was made slightly easier because we always have fish on Fridays, so I only had to decide how to make the fish Southern. After leafing through a stack of Bon Appetit magazines I decided to combine a couple of their recipes to make one of my own. From Mahi-Mahi with Blood Orange, Avocado and Red Onion Salsa from the February 2005 issue and Shark and Bake from the May 2006 Caribbean issue, Captain Brilynn’s Caribbean Catch was born, (and yes, I like alliterations, I even considered changing my name to Crilynn for the occasion).

Captain Brilynn’s Caribbean Catch

3 fillets of tilapia

Marinade:
2 garlic cloves
Bunch of cilantro, chopped
Juice of half a lemon and a whole lime
Half a scotch bonnet pepper, minced
Splash of orange juice

Salsa:
1 orange, segmented
1 avocado, cubed
1/3 chopped Spanish onion
Half scotch bonnet pepper, minced
Juice of Half a lime and some lime zest
Bunch of cilantro, chopped
Salt and pepper

Photobucket - Video and Image Hosting

Preheat the oven to 375F. Mix the marinade together, pour it over the tilapia and let sit for 20-35 minutes. Put into the oven for ~10 minutes, or until fish is cooked through. Mix the salsa together and spoon over the fish when it comes out of the oven. Easy.

So what did it taste like? The Caribbean is hot and so is my food! I love scotch bonnet peppers, they add great heat but aren’t overpowering (when used in moderation). Tilapia is a pretty mild fish so the citrus and spice complimented it nicely, and the smoothness of the avocado helped to balance out the scotch bonnet’s heat. If, heaven forbid, you don’t like cilantro, I’m sure some other herb would substitute nicely, but I like cilantro. I served it with some spice roasted potatoes, they’re even better than french fries.

This recipe is a keeper, now I just need a Juba to cap it off. And a trip to the Caribbean.


Technorati Tags:
+ + + +

October 19, 2006

They're Just Brownies... Or Are They?

Photobucket - Video and Image Hosting

Up A Creek Without A PatL is hosting this round of Weekend Herb Blogging which was originally started by Kalyn’s Kitchen. As I understand it, all you have to do is cook with a herb and write about it. No problem. I’ve had this recipe floating around in my head for quite a while now but never got around to making it. The recipe may be a bit unusual for WHB because it’s not a main course, but it’s sort of unusual for a dessert too. At this point you’ve already seen the picture of brownies and are probably wondering what herb I stuck into them. That herb would be basil, the plant that tastes somewhat like anise, with a strong, pungent, sweet smell. The idea for basil brownies came to me one day while eating a chocolate chip cookie. I had just finished picking a whole bunch of basil to make pesto and the smell of basil was still on my hands. As I bit into my chocolate chip cookie, the taste of chocolate combined with the smell of basil and the result was quite pleasing. It was at that point that I decided I would attempt to make basil brownies.

Shortly thereafter I saw a post on Kiss the Hem of Her Apron with brownies that she claimed were made from the last brownie recipe she would ever use, because they were just that good. I’m always intrigued by recipes that people claim are the best ever and I usually try them because I like to know what other people consider the best. However, no matter how good they are, they will never live up to the hype, (see Lawsuit Buttermilk Muffins for more details…). This doesn’t mean that the recipe isn’t amazing and that I won’t make it and enjoy it again and again, it just means I don’t believe in perfection. That’s both good and bad, but what are you gonna do?

Anyways, I decided to kill two birds with one stone and make both the only brownie recipe that Kiss the Hem of Her Apron will ever use again, as well as my basil brownies. I only made one batch of brownies, but divided the pan into two sections, separated by some tin foil. I poured half of the brownie mixture into one side of the pan, added the basil and then poured the rest of the mixture into the other side. When I originally conceived of this idea, I thought I would use fresh basil, plucked from my garden. That would have worked if I had made the brownies at the same time I had the idea. Instead, when I went out to my garden today to pick some basil I found nothing but naked stems. Right, that whole snow thing. Wikipedia tells me that basil is very sensitive to cold, and grows best in hot, dry conditions. And so I went back into the kitchen to rummage around the spice cabinet in search of some dried basil. I have a feeling the basil I found was past its prime. Throughout the summer I never used dried herbs because I have everything I could ever need in my garden. Unfortunately, Canadian winters are not very accommodating to herb gardens and for some reason I haven’t cultivated herbs indoors like smarter people do. Dried basil doesn’t have the same flavour as fresh either, but it was all I had and I was determined to make the basil brownies so I was using it. I don’t think I would have had to use nearly as much basil (4 tsp for half a batch of brownies) if my dried basil had been better, or if it had been fresh. My final verdict on these though is that they’re pretty decent. I like the fact that it’s an unusual flavour, definitely very basilly, but still chocolately as well. I’d make them again, but with fresh basil.

Brilynn’s Basil Brownies (or B3)
Adapted from Alice Medrich's ‘Cookies and Brownies’
Serves 16… if you like small serving sizes

6 T butter, (salted was all I had so I didn’t add any additional salt to the recipe)
4 ounces unsweetened chocolate
1 1/4 cups sugar
1 t vanilla extract
2 eggs + 1 egg yolk
1/2 cup all purpose flour
4 tsp dried basil

Preheat the oven to 400F and line and 8-inch square metal baking pan with foil. I made a half and half recipe so I divided the pan in two. This meant all the basil went into one side, making it very basilly.

Melt the butter and the chocolate together, on top of a double boiler or in the microwave, stirring often until smooth. Stir in sugar, vanilla and salt. Add eggs one at a time, followed by flour. Stir until very smooth, about 1 minute. If you’re making a half and half recipe as well, pour half the batter into the prepared pan, add the basil to the remaining batter in the bowl, combine and then pour into the other half of the pan.
Bake at 400F for 20 minutes.
Meanwhile, prepare a water bath. Fill a large roasting pan with water and ice about 1 inch deep.
When the brownies are done - and they will look a bit dry on top - take them immediately from the oven and place in the water bath. Add more ice to the water if necessary. Allow to cool completely in the bath before removing the pan and cutting the brownies.
Store in an airtight container for up to 3 days.


Technorati Tags:
+ + + + +

October 18, 2006

All grown-ups were children first. (But few remember it).

Photobucket - Video and Image Hosting

Stephanie of Dispensing Happiness is hard at it again, hosting Blog Party #15. This month the theme was a Literary Party. That meant taking inspiration from your favorite story and turning it into appetizers and cocktails. I’ve been doing a whole lot of reading lately, and many of the books I’ve been reading also have recipes in them (books by Ruth Reichl, Michael Ruhlman, that sort) but I figured just adapting one of those recipes to suit the party was too easy. Then I tried think of my favourite book and I found it pretty hard to pin one down. When I was a kid I loved Charlotte’s Web and The Secret Garden, but I couldn’t come up with something that I really liked now. I considered using one of my childhood books for a little trip down memory lane, but the last blog party was kid themed so I opted for something different. Sort of. The book that I chose appeals to children and adults alike. When I finally thought of it I realized this is definitely my favourite book of all time; The Little Prince by Antoine de Saint-Exupéry. It was originally published in 1943 in French and has since been translated into tons of other languages. At first glance The Little Prince may look like a children’s book but it contains a lot of valuable lessons about life and love that adults would do well to learn.

“Les grandes personnes ne comprennent jamais rien toutes seules, et c'est fatigant, pour les enfants, de toujours leur donner des explications. ”

The Little Prince the character comes from a star where he looks after a single rose and protects her from the elements. One day he travels away from his planet to see what else exists and encounters a variety of people on different planets, eventually arriving at Earth and meeting a fox, a snake and a pilot whose plane has crashed in the desert. That may not sound like the most exciting overview ever but the book is wonderful and everyone should read it. There are some illustrations, it’s not very long and can be read in one sitting. I’ve read it tons and tons of times, in both French and English. In elementary school I even did book reports on this book… also in French and English, it served many purposes. 

Photobucket - Video and Image Hosting

Now then, back to the party. I decided to make a Lemony Starfruit Kuchen for my Little Prince. I had actually bought a starfruit a few days ago, not even thinking about the Blog Party, (I hadn’t even chosen my book at that point) but just because I thought they looked pretty cool. I then went online trying to find out what one could do with a starfruit. My first conclusion was not much. The majority of people seemed to suggest cutting it up and putting it in fruit salad or just eating it on its own. This was not very exciting. I kept looking and found a site called Nikibone which had a variety of starfruit recipes, including one for Lemony Starfruit Kuchen. I planned on making it the following day and then when I decided that I was going to use The Little Prince for the Blog Party everything just fell into place. A starfuit kuchen would be perfect for the Little Prince who lives on a star. Of course I made a couple changes to the recipe, I was all out of molasses so I replaced it with honey and I added extra lemon. Despite their beauty, starfruit don’t have a whole lot of flavour. They’re slightly bitter and I think they’re best used as garnish cause they’re so pretty. It was really the lemon that stood out flavour wise.

"Language is the source of misunderstandings."


The kuchen may not look like finger food, but as his name suggests, the Little Prince is quite little. For anyone other than the Little Prince, the kuchen would be a bite sized treat with a tiny scoop of one bite ice cream on top, it just looks big because the prince is so small. I added a scoop of spiced pear ice cream because the sweetness of the ice cream was a nice compliment to the sour lemon and starfruit. The kuchen base was good as far as I could tell, but then again I wouldn’t know one kuchen from another so I might not be very trustworthy in that respect.

Photobucket - Video and Image Hosting

“All men have the stars," he answered, "but they are not the same thing for different people. For some, who are travelers, the stars are guides. For others they are no more than little lights in the sky. For others, who are scholars, they are problems. For my businessman they were wealth. But all these stars are silent. You-- you alone-- will have the stars as no one else has them--"

Now that my Prince has something to eat, he also needs a drink. I don’t believe that the little guy is much of a boozer, (he meets one in the story and is none too impresssed with him) so I have made his cocktail a virgin. It’s a fairly straightforward drink, and like the starfruit kuchen, is pleasing to the eye. I have suitably named this cocktail Prince’s Punch and served it in a tiny, prince sized glass.

Photobucket - Video and Image Hosting

And there you have it, my contribution to the Literary Blog Party. I highly recommend that you read and re-read The Little Prince. I assure you, you’ll love him as much as I do.
Recipes follow.

Lemony Starfruit Kuchen (adapted from Nikibone)

1/2 cup all purpose flour
1/2 cup yellow cornmeal
1/3 cup quick cooking rolled oats
1 teaspoon baking powder
1/8 teaspoon baking soda
2 egg whites
1/2 cup plain nonfat yogurt
1/3 cup packed brown sugar
2 tablespoons honey
2 tablespoons margarine, melted
2 teaspoon lemon peel, finely shredded plus the juice of half a lemon
nonstick spray coating
1 large star fruit cut into 12 slices
2 teaspoons granulated sugar

In a large bowl, stir together flour, cornmeal, oats, baking powder and baking soda. In another bowl stir together egg whites, yogurt, brown sugar, honey, melted margarine, lemon peel and juice. Add egg white mixture to flour mixture, stirring just till combined. Spray an 8 inch round quiche pan or cake pan with nonstick spray coating. Spread batter into prepared pan. Gently press star fruit slices into batter. Bake in a 350F oven about 30 minutes. Remove and lightly sprinkle with granulated sugar. Return to the oven for a minute or two until a toothpick inserted near center comes out clean. Cool slightly in pan on a wire rack. Cut into wedges. Serve warm with ice cream. The kuchen is also nice the next day, cold with a cup of coffee.

“Voici mon secret. Il est très simple: on ne voit bien qu'avec le cœur. L'essentiel est invisible par les yeux.”

Prince’s Punch

1 part Tropicana citrus twist juice
1 part 7up
A few drops of grenadine

Pour each part into a glass, do not stir if you want to retain the layered look.


Technorati Tags:
+ + + + +

October 17, 2006

Ooey Gooey Rich and Chewy Inside, Chocolate Cakey Yummy Tasty Outside

Photobucket - Video and Image Hosting

I think it’s obvious that I like chocolate. Well, I guess it’s probably obvious that I like anything that’s edible, but chocolate is especially good. I like a variety of textures too, so a chocolate molten cake is an excellent dessert choice. Cakey on the outside, gooey on the inside and chocolate all over. I’ve seen it numerous times on restaurant menus and in pictures but I’ve never actually had one. I decided to change that by making it myself. It’s a pretty easy recipe, the only problem I had was my lack of appropriate sized molds. The ramekins I have are mini so my molten cakes ended up being mini. That just meant there were more of them to eat. It also meant I got to find out what happens when the lava interior cools off. Most recipes will tell you that molten cakes are best eaten straight out of the oven and this is true if you want it to retain the title of molten cake. But as I found out, if you put leftovers in the fridge, (if you actually manage to have leftovers) the molten part hardens and becomes somewhat chewy. No matter which way you eat it, it’s chockfull of chocolate so it’s got to be good. It’s also a Nigella Lawson recipe so mark me down as another step closer to becoming a complete Domestic Goddess.

Molten Chocolate Babycakes

Scant ¼ cup soft, unsalted butter, plus more for greasing
12 ounces best bittersweet chocolate (I substituted about a third of it for dark chocolate with good results)
½ cup sugar
4 large eggs, beaten with a pinch of salt
1 teaspoon vanilla extract
1/3 cup all purpose flour
6 individual 6-ounce custard cups, buttered (I actually halved the recipe and since I made them in mini ramekins I ended up getting 5 molten cakes, so the originals are quite large)

Preheat oven to 400F, putting in a baking sheet at the same time. Put the custard cups on parchment paper, trace rounds, cut them out and press into the base of the cups.

Melt the chocolate and let cool slightly. Cream together butter and sugar. Gradually beat in eggs and salt, then vanilla. Add flour and when it is smoothly combined, add the cooled chocolate and blend to a smooth batter.

Divide the batter between the 6 cups, quickly whip the baking sheet out of the oven, arrange the cups on it and replace. Cook for 10-12 minutes and turn the cakes out onto plates as soon as they’re removed from the oven. You can also make the cups up in advance, cover them with plastic wrap and put in the fridge until right before serving, that’s what the extra 2 minutes of cooking time is for because you’re putting them into the oven cold. Simple and very presentable.

Technorati Tags:
+ + + > + > +

October 16, 2006

Whipped Cream- Miracle Worker Extraordinaire

Photobucket - Video and Image Hosting

Birthday time! Not mine just yet, but a friend’s. I was trying to figure out what kind of cake to make her and decided right away that I wanted to incorporate her favourite chocolate bar (Coffee Crisp) into it somehow. My friend isn’t a big fan of your average ‘birthday cake’ cake, so I knew I wouldn’t be making a white cake or plain layer cake of any sort. I started thinking about how I could make a cake with Coffee Crisp and concluded that the cake itself should also contain coffee. Browsing Epicurious led me to a recipe for a Dark Chocolate Torte.

This torte was also supposed to be topped with a spiked blackberry coulis, but when I think about how my torte would have looked naked, except for a thin coulis topping, I’m glad I went the route I did. That might sound like it turned out poorly, I assure you, it didn’t, just not that way I had originally planned. In the end the cake was attractive and no one would have known that it didn’t look as it was supposed to, except that I’m now saying so (I think I would appear to be a much better cook/baker/kitchen disaster if I didn’t, but oh well). I changed the recipe slightly, but not on purpose. I just didn’t read the recipe properly (a frequent error of mine, I never learn) and ended up adding more butter and chocolate than was called for in the torte. But really, how can extra butter and chocolate be a bad thing? The recipe also called for instant espresso powder but I didn’t have any so I substituted 2 tablespoons of instant cappuccino mix with decent results.

Photobucket - Video and Image Hosting

When it came time to pouring the batter into the pan I thought I would be extra clever and use a birthday cake mold on the bottom of the springform pan. I had never used a mold like this before and was pretty excited that I would finally be trying it out. The recipe, however, calls for you to put parchment paper in the bottom of the pan, but I thought that would ruin the effect of the mold (it’s pretty thin) so I just greased it really well. The greasing was not successful. I had to scrape the cake off of the mold, completely destroying any picture there might have been and making the top of the torte look like a minefield. My previous plan of sprinkling coffee crisp on top of a chocolate glaze was definitely not going to cover my mistakes. That’s when I turned to my old pal whipped cream. Whipped cream hides ANY mistake, and as an added bonus it’s tasty too. Of course I didn’t have any cream in the fridge so I had to get in the car and get some, (3rd trip of the day thanks to my lousy memory). Once the cream was home though, it whipped up easily and did a marvelous job of covering the minefield of a cake that I had made. I had bought two Coffee Crisp bars to chop up and crumble on top, but I got hungry while making the cake and ate most of one of them. I knew there was a reason I bought two. In its final state, my dark chocolate torte was more than presentable and quite good, though very decadent. The torte was soft with an almost cakey/pudding consistency in the middle and the Coffee Crisp on top was very much appreciated by the birthday girl.


Technorati Tags:
+ + + +

October 15, 2006

A Great Excuse to Get In the Kitchen

The International Union of Bakers and Bakers-Confectioners (UIB) declared the 16th of October as World Bread Day. In honour of World Bread Day, Kochtopf has invited all bloggers (and non-bloggers too) to bake bread and blog about it and share it with everyone. A round up of breads from all over the world will be posted on the 17th.

Photobucket - Video and Image Hosting

The smell of bread baking alone should be enough to convince you to bake bread, but if you need another reason, why not World Bread Day? I consider both to be excellent reasons, so I whipped up a Buttermilk Honey Wheat bread with a recipe from allrecipes.com. Apparently my bread was pretty excited that he was going to be participating in World Bread Day, as it appears as though his top exploded. I will just call him an “artisan” loaf. Those crazy artists will make anything.

The recipe calls is for a bread machine, but I’ve recently relocated my bread machine to the basement and have taken to baking bread in the oven. Instead of looking for another recipe, I looked to a fellow blogger for help, Baking and Books has written a modified version of this bread for those of us who refuse to use the machine. It’s not that I have anything against the bread machine… if it means you’re not buying Wonderbread. That’s unfair of me. When I first got my bread machine I used it all the time, I was constantly chucking in some ingredients and then letting the machine do its thing. I thought it was great. But after a while I made less and less bread. Something was wrong. I started to resent the bread that I did make. I no longer had the satisfaction of kneading the dough, which is really the best part of bread making, (next to the heavenly smell that comes from the oven). The bread machine also had a habit of producing ugly bread. The top was all craggy, the bottom had a hole in it and it was always the same boring square shape. There was no mushroom effect from a loaf that’s bursting out of its pan, no freeform artisan style breads, no diversity! Every loaf looked the same, and every loaf looked ugly. Not only that, but the bread machine took up too much space on my counter, precious space that I could be using for other more important appliances. So one day, when no one was home, I unplugged the bread machine, quietly took him downstairs and laid him to rest among some old ski boots, a car seat and a roasting pan. It was 3 weeks before anyone even noticed he was missing and I’ve been producing happier, prettier bread ever since. And it’s not hard either, so get in your kitchen and make some bread!

Happy Bread Day!


Technorati Tags:
+ + +

October 14, 2006

Make Mine A Double

Photobucket - Video and Image Hosting

Meeta of What’s For Lunch Honey? is awfully busy this month, hosting both the Monthly Mingle and Mixology Monday. Since I got my risotto dish done in time for the Monthly Mingle I figured I could also mix up a drink for Mixology Monday. The theme is Exotic Cocktails and with the snow currently swirling outside my window, I would like nothing more than to be lying on a hot beach with my toes in the sand, leisurely sipping an exotic cocktail. Well, since that’s not happening, the best I can do is to turn the fire place up high and down a few cocktails anyways.

I didn’t invent this drink, I don’t know who did and I don’t know if it has an official name. All I know is that it’s very good, easy to make and that I have opted to call it a Juba, a combination of Jamaica and Cuba. I suppose I could also have called it a Cubaica or a Jamba or a Cumaica, but I didn’t, I called it a Juba. The name stays. The recipe is as follows:

Photobucket - Video and Image Hosting

Fill a glass with crushed ice, add 1 shot of dark Cuban rum, (or 2…) fill the rest of the glass with Jamaican gingerbeer and top with a squeeze of lime. Sugar rim, yellow umbrella and lime slice are optional. Repeat as necessary.

Cheers!


Technorati Tags:
+ + +

October 13, 2006

Hay Hay it’s Donna Day… With A Little Help from Jamie Oliver-ay

Photobucket - Video and Image Hosting

It’s time for another round of Hay Hay it’s Donna Day, this 6th edition is being hosted by JenJen of I Love Milk and Cookies. JenJen earned the title of host after winning the 5th round with her Three Olive Tart with Goat’s Cheese and Rosemary. Along with being host, she received the privilege of selecting the theme for the 6th edition: Fritters. The fritters could be savory or sweet and as I’ve been making a lot of sweet items lately, I opted for the savoury. The recipe I selected just sort of appeared in my lap at the same time as Dad was asking me what I wanted to do with the haddock he had brought home for dinner. I was flipping through Jamie Oliver’s cookbook ‘Jamie’s Dinners’, not looking for anything in particular and just as Dad was asking me about haddock I came across a haddock fritter recipe. It was a sign. I was meant to make the fritters.

Of course, this challenge is all about Donna Hay, so I stopped to think for a minute if a Jamie Oliver recipe was appropriate. I came to the following conclusions:
1- In the book ‘Jamie’s Dinners’, he’s encouraging people to cook by presenting simple, tasty recipes, very much like Donna Hay.
2- When I participated in HHDD#5 I used a recipe that I made up on my own but it adhered to the theme of savoury tart and was accepted. My savoury fritter also adheres to the general fritter theme.
3- If you add –ay to Oliver, it becomes Olive-ay and that rhymes with Hay. They’re practically the same person.
And based on these conclusions, I decided that my Jamie Oliver recipe was acceptable, and as usual, I would modify it slightly anyways. Olive-ay’s recipe didn’t come with a dipping sauce so I chose to make my own which consisted of homemade tzatziki drizzled with sweet chili sauce. And now, without further ado, here is my version of South American Fishcakes from ‘Jamie’s Dinners’:

Haddock Fritters with Bri’s Dipping Sauce

2lb 3oz haddock fillets
2/3 cup milk
2 bay leaves
1 pound sweet potato, peeled and diced
1 pound white potato, peeled and diced
Big bunch of parsley, finely chopped
Bunch of mint, finely chopped
Small bunch of cilantro, finely chopped
2 green onions, finely, chopped
Zest of 2 lemons and 2 limes
1 teaspoon fennel seeds, finely chopped
2 eggs
1 tablespoon scotch bonnet pepper sauce
Sea salt and freshly ground pepper to taste
¾ cup flour
Sunflower oil for frying
Juice of lemons and limes

Preheat oven to 375F. Place haddock in deep pan with milk and bay leaves, cover with tinfoil and cook for 15 minutes. At the same time, cook potatoes in pot of boiling salted water for ~15 minutes or until soft. Drain them, return to pan and mash.
Flake the cooked fish into a large bowl. Add mashed potatoes, parsley, mint, cilantro, green onion, lemon and lime zest, fennel seeds, eggs, pepper sauce, salt and pepper. Mix well.
Cover your work surface with the flour. Take a large tablespoon of the mixture into your hands, shape it into a ball and roll in the flour to coat, then flatten into a small pancake. Repeat until your bowl is empty.
Pour enough oil into a heavy bottomed saucepan to fill 1/3 of the way up. Heat oil over medium heat and then fry fish cakes until brown and crispy, flipping them after a couple minutes. Don’t overcrowd the pan. Drain on paper towels and drizzle with lemon juice. Serve with dipping sauce.

Photobucket - Video and Image Hosting

Tzatziki

2 cups plain yogurt, drained if you have the time
1/2 cucumber or more, not peeled, seeded and chopped
1/1-2 teaspoons salt
2 garlic cloves, chopped
2 tablespoon chopped fresh dill
1 tablespoon extra virgin olive oil
1 teaspoon red wine vinegar
1/4 teaspoon ground black pepper

Whirl it all together in a food processor and there you have it. If you haven’t drained your yogurt ahead of time it will be runnier, but still good. If you refrigerate the finished sauce overnight it will thicken up somewhat. I drizzled store bought sweet chili sauce over the tzatziki before serving, it made for nice visual contrast and it tastes pretty good too.

The haddock fritters were really simple to make and I will certainly make them again, probably with one variation or another, I’m always looking to try something new. The recipe could be endlessly varied by substituting different types of fish or adding shrimp or scallops to the mixture. I considered adding shrimp and scallops to mine but then realized that my savoury tart of HHDD#5 had used shrimp and scallops and decided a repeat so soon wasn’t good, especially when I had plenty of haddock available. Not to worry though, the shrimp and scallops ended up getting puréed and put into wontons for a seafood wonton soup, they definitely didn’t go to waste.


Technorati Tags:
+ + + +

October 12, 2006

1982- Yummy, Warm, Sweet

Photobucket - Video and Image Hosting

It’s time for the 3rd Retro Recipe Challenge. The RRC is a celebration of retro food and retro recipes, both delicious, like Mom’s meatloaf, and disgusting, like benedictish frankwiches. It’s fun, it’s ridiculous, it’s food and pop culture – it’s the Retro Recipe Challenge!

This time around the challenge is to create a recipe from the year of your birth. Originally it was supposed to come from Gourmet magazine, but the online archives aren't very complete so the topic was broadened to be any recipe within 5 years of your birth. It took me quite a while to find a recipe that I wanted to make that was an appropriate age. I eventually found one in the same month as my birth, though not exactly the right year, close enough. I had a lot of fun digging through old cookbooks and discovered that Mom keeps milk calendars and they’re full of interesting recipes. I found homemade cookbooks, community cookbooks, handwritten recipes, cookbooks with yellowing pages, but my ultimate selection came from an issue of Canadian Living from November, 1982. This is the only issue of Canadian Living that I found in my entire house, I don’t know where it came from or why we still have it, but it was hanging out with the milk calendars. When I saw the cover I knew that’s what I was going to make. Cinnamon buns.

Photobucket - Video and Image Hosting

Reading through the old issue of Canadian Living was pretty funny. There was an article about trendsetting chefs which featured “talented young artist” Jamie Kennedy who was helping to create one of the country’s most exciting new restaurants! I was tempted to make his recipe for Apple and Almond Cake, but I didn’t have a few of the ingredients, and besides that I really wanted cinnamon buns. The recipe explained how to make either an entire pan of cinnamon buns or individual ones done in custard. Since I wasn’t planning on making 30 buns, (although the thought was tempting) I opted for the custard cup method. I also reduced the recipe, but that was the only change I made. I was going for the retro thing…

Photobucket - Video and Image Hosting

Cinnamon Buns

2 tsp granulated sugar
1 cup lukewarm water
1 pkg (1tbsp) active dry yeast
1 cup milk
¼ cup vegetable oil
2 tbsp granulated sugar
2 tsp salt
2 eggs lightly beaten
6 cups (approx) all purpose flour
1 cup soft butter or margarine
2/3 cup packed brown sugar
1 cup raisins
¼ cup melted butter or margarine
2 tsp cinnamon
1 cup corn syrup

In large mixing bowl, dissolve 2 tsp sugar in lukewarm water. Sprinkle yeast over water and let stand 10 min until bubbly.
In small saucepan, scald milk. Add oil, 2 tbsp sugar and salt; stir until sugar dissolves. Add milk mixture and beaten eggs to dissolved yeast. Gradually beat in 3 cups flour; beat vigorously by hand or with an electric mixer until smooth. Using a wooden spoon, stir in enough remaining flour to make a dough that is easy to handle.
Turn dough out onto floured board. Knead until smooth and elastic, about 5 min. Place in a greased bowl, turning to grease all sides. Cover with a clean towel and let rise in a warm draft-free place for 1-1 ½ hours or until doubled in volume.
While dough is rising, stir together soft butter and brown sugar. Divide mixture between two 13 x 9 inch baking pans, spreading evenly. Sprinkle ½ cup raisins over mixture in each pan.
When dough is doubled, punch down and divide in half. Roll out each half on lightly floured board to 15 x 8 rectangle. Brush each rectangle with 2 tbsp melted butter and sprinkle with 1 tsp cinnamon and half the remaining raisins. Roll up rectangle jelly roll fashion, beginning with at the wide end. Pinch edges of dough together along length of roll.
Slice each roll into 15 pinwheels. In each pan, arrange pinwheels slightly apart, cut side up. Cover and let rise 30 min or until doubled in volume.
Bake in 400F oven for 20 min. Pour ½ cup corn syrup over each pan and bake for 5 more minutes. Remove from oven and let stand 1 min, invert pans onto large trays. Serve warm. Makes 30 rolls.
Note: To make large individual buns as shown on cover, divide brown sugar-butter mixture among 16 greased 6 ounce custard cups. Sprinkle a few raisins in each cup. Cut each roll of dough into 8 pieces. Place each piece cute side down in prepared custard cup. Spoon 1 tbsp corn syrup over each for last 5 min of baking. Makes 16 large buns.

Canadian Living, November 1982


Technorati Tags:
+ + + +

October 11, 2006

Monthly Mingle: Return of the Zucchini

Photobucket - Video and Image Hosting

Meeta of What’s For Lunch Honey? is the host of the Monthly Mingle which is now entering its 5th month. Previously she had given a theme and allowed the participants to pick their own ingredients, but she decided to switch it up this month. The theme is ‘Take Two’ and the rules are simple- make any dish you want but you have to use zucchini and sage, (therefore accommodating the crazy veggies). I had been looking forward to participating in the Monthly Mingle, but when the theme was announced and zucchini was one of the ingredients I decided I probably wouldn’t enter. At that point I had eaten more than my share of zucchini, and forced a great number of other people to eat the overly fertile plant. Then a couple weeks went by and I decided that the zucchini in my garden had been ignored for long enough. I walked cautiously out to check on what had happened in my absence. On the way to the zucchini patch I picked a nice butternut squash, some sage and parsley. I saw the zucchinis long before I arrived anywhere near them. I stayed well away from a zucchini that was about two and a half feet long (no lie), plucked a small and manageable zucchini from the stem and ran back to the house.

Once safely inside I set about making my zucchini and sage dish, which was actually going to be a Roasted Butternut Squash Risotto with special guests Zucchini and Sage. Risotto is not difficult to make, it’s just time consuming and requires constant attention. There’s no slacking off when risotto is on the stove. That doesn’t mean you can’t work on other things too, but you must remain in the kitchen. I managed to make chicken breasts stuffed with chorizo sausage, old cheddar and some fennel at the same time as the risotto and neither one seemed to suffer. As usual, I found a recipe that seemed alright and then made it my own. The original recipe is from the November, 2001 issue of Gourmet and is simply for Roasted Butternut Squash Risotto. My recipe subtracted some ingredients, added others and changed the proportions. I’m happy with the way mine turned out. Sage isn’t a herb I cook with very often but I should, it gave excellent flavour.

Photobucket - Video and Image Hosting

Bri’s Roasted Butternut Squash Risotto with special guests Zucchini and Sage
Active time: 35 min Start to finish: 1 1/4 hr (ideally)

1 ½ lb butternut squash
3 cups nonfat chicken broth
1 small onion, chopped
½ tablespoon unsalted butter and a drizzle of olive oil
¾ cup Arborio rice
2 cloves minced garlic
½ cup finely grated Parmigiano-Reggiano
Pinch sea salt
2 tablespoons chopped fresh sage
2 tablespoons chopped fresh parsley
1 ½ cups grated zucchini, excess water squeezed out

Roast squash:
Preheat oven to 450°F.
Halve squash lengthwise and seed, then cut crosswise into 1 1/2-inch-wide slices and season with salt. Roast slices, skin side down, in a shallow baking pan with a bit of water, in middle of oven until tender and golden, about 50 minutes.
Set aside 6 crescent-shaped squash slices for serving and keep warm. Cut flesh from remaining slices into 1/2-inch pieces, discarding skin.
Start risotto after squash has been roasting 40 minutes:
Bring broth to a simmer and keep at a bare simmer, covered.
Meanwhile, cook onion in butter and oil in a 4-quart heavy pot over moderate heat, stirring, until softened, about 6 minutes. Add rice, garlic and cook, stirring, 3 minutes.
Stir in 1/2 cup simmering broth and cook at a strong simmer, stirring frequently, until broth is absorbed. Continue simmering and adding broth 1/2 cup at a time, stirring constantly and letting each addition be absorbed before adding the next, until rice is creamy-looking but still al dente (it should be the consistency of thick soup), about 18 minutes total. (There will be leftover broth.)
At the same time I briefly sautéed the grated zucchini in a separate pan. When the risotto is done, stir in squash pieces and zucchini, then stir in cheese, sage, parsley and simmer, stirring, 1 minute. (If necessary, thin risotto with some leftover broth.)

Serve risotto immediately, with reserved squash slices.

Makes about 4 large side servings.

Adapted from Gourmet, November 2001


Technorati Tags:
+ + + +

October 10, 2006

Creating Chocolate Cherry Cheesecake

Photobucket - Video and Image Hosting

This recipe was a collaboration between Mom and I. It was created on a warm and sunny day when we were planning on going for a hike but first had to make dessert as company was coming for dinner. We were looking for something quick so that we could spend more time outside. The recipe itself didn’t take long to make but we spent about an hour looking through cookbooks trying to find something. Mom complained that we could have had the dessert made in the time it took us to choose a recipe. I wasn’t too concerned, I enjoyed reading and looking at recipes. We had three bars of cream cheese in the fridge and we’d been tentatively looking for a cheesecake recipe, but some of them were too elaborate for our time frame and we didn’t have the right ingredients for others. We had 2 blocks of regular cream cheese and 1 block of chocolate cream cheese so we decided to make a swirled cheesecake. Looking on the cream cheese box itself for a recipe, we found that the different cream cheeses offered different recipes so we modified both of them to make our own concoction. The recipe on the plain cream cheese box was for a lemon cheesecake and called for ¼ cup of lemon juice, but I decided I would add a ¼ cup of wild cherry syrup instead to make a pink swirl. We got the whole cake together, put it in the oven, left instructions for my Grandma to take it out when it was done and left for our hike.

Upon our return I found that the cheesecake had a few fairly large cracks. I was disappointed by this, but then I thought of a recent post I saw on Culinary Concoctions by Peabody. As far as I’m concerned she’s a genius with fixing things. I was very impressed with her broken cheesecake remedies. My solution was not nearly as creative but it worked. Actually, it didn’t work quite as planned, but no one really knew except me. I had some milk and white chocolate swirl chips and I thought I could melt and drizzle them over the cracks and still have them retain their swirl. Of course as they melted the white and milk chocolate swirl mixed itself into a light brown colour instead of a pretty light/dark swirl that would have complemented the cherry/chocolate swirl. The chocolate didn’t drizzle as well as I had hoped either, it was a bit globby. The end result was decent though. The cherry flavour wasn’t overly strong, I would perhaps call it ‘cherry scented chocolate cheesecake’. For more cherry flavour next time I might add some additional cherry flavouring or kirsch. And I think I would use dark chocolate as a drizzle on top, it would have had more visual contrast that way, plus I just like dark chocolate better. Overall it’s not bad for a recipe that was hodgepodged together from 2 recipes and 2 people.

Photobucket - Video and Image Hosting


Pink Chocolate Cheesecake

Crust:
2 cups graham crumbs
1/3 cup melted butter
¼ cup sugar
Combine everything and then press into a springform pan and bake at 325F for 5 minutes. Let cool.

Cherry Filling:
2, 8oz packages of cream cheese
2 eggs
1 tsp vanilla
½ cup sugar
¼ cup wild cherry syrup
Blend everything until smooth.

Chocolate Filling:
1, 8oz package cream cheese
1 egg
1 tablespoon cocoa
Blend everything until smooth.

When the crust has cooled, pour in ½ cherry filling, then chocolate filling, then the remaining cherry filling. Using a knife, drag it through the fillings to create swirls. Bake in 325F oven for 45-50min. The middle will not be completely set but will continue to do so as it cools. Let cool completely, ~6 hours to overnight.
I added melted chocolate on top to fix cracks. I think a cherry sauce would have been good too, but I would only spoon it onto individual slices because otherwise you’d hide the swirl, and that was the whole point.
Enjoy.


Technorati Tags:
+ + +

October 09, 2006

Turkey For Everyone! (Except those crazy veggies...)

Photobucket - Video and Image Hosting

I'm going to make this pretty quick as family time dominates this weekend. I hope everyone who's celebrating Thanksgiving is having a wonderful one, and for those of you who aren't, well, that's unfortunate. My condolences.

The two things that scream Thanksgiving the most, you know, besides all the 'being thankful' stuff are turkey and pumpkin pie and I have been indulging in both of those heartily.

Photobucket - Video and Image Hosting

In my attempt at the pie I completely missed a very large step in the recipe, but it seems to have turned out ok nonetheless. The pie is actually maple-pumpkin and I was supposed to boil the maple syrup first, almost to softball stage. I only remembered to do that after I had dumped the maple syrup, cream, pumpkin, eggs, etc. into Wilbur and he was had at work, whisking them together. At that point I either had to start over or push on through and hope for the best, I opted for the later.

Happy Thanksgiving!


Technorati Tags:
+ + + + +

October 08, 2006

The Curse of the Over-Hype

Photobucket - Video and Image Hosting

Recently I made the fabled “Lawsuit Buttermilk Muffins”. I’ve read about them in quite a few places, Cream Puffs in Venice and Kitchen Wench have both done their version. They’ve been getting rave reviews and with a name like Lawsuit Muffins there’s got to be something to them. Unfortunately this was what also led to their downfall in my eyes. Had I of stumbled upon this recipe myself and it was called something like buttermilk muffins or something unsuspecting like that, I probably would have loved them. That, however, was not the case. In my eyes these muffins had been hyped up to unrealistic standards and now they suffer from the curse of the over-hype. Anything that has been overhyped is bound to fail. I’m sure some people can look beyond the hype and see these muffins for what they really are, but not me. I got caught up in the glitz and glam of the possibility of a muffin so good that it resulted in lawsuits. With expectations this high I was destined for disappointment. But don’t let me dissuade you from making these muffins. The crumble on top is excellent, the muffins are moist and not sickeningly sweet, they freeze well and the fruit inside is interchangeable. There’s really nothing not to like about these muffins. They are in fact quite delicious and are wonderful by any realistic standards. I just shouldn’t have expected Pierre Herme from my lowly kitchen.

Photobucket - Video and Image Hosting

Curiously, the other treat I made at the same time as the muffins was a Donna Hay recipe for double chocolate cookies. I had no real expectations for these cookies, no one had told me about them and all I knew was that they contained a massive amount of chocolate. They were divine. A rich chocolate cookie with chunks of chocolate that left people wanting more. Here I go, overhyping the cookie for you. Ruining your chances of enjoying it. Sigh. Make both of these treats, they’re good, just don’t expect the sky to fall.

Double Chocolate Cookies
120g (4 ½ oz) dark chocolate, chopped
110g (4 oz) unsalted butter, softened
¾ cup brown sugar
1 egg
1 tsp vanilla extract
1 cup all purpose flour, sifted
¼ cup cocoa powder, sifted
1 tsp baking soda
½ tsp salt
280g (9 ¾ oz) dark chocolate, chopped

Preheat the oven to 320F. Place the chocolate in a heatproof bowl over a saucepan of simmering water and stir until the chocolate is melted and smooth. Set aside.
Place the butter and sugar in the bowl of an electric mixer and beat for 8-10 minutes or until ight and creamy. Add the egg and vanilla and beat for a further 3-4 minutes. Stir through the flour, cocoa, baking soda, salt and melted chocolate. Add the extra chopped chocolate and stir to combine. Roll tablespoons of the mixture into rounds. Place on baking trays lined with baking paper, allowing room for the cookies to spread, and flatten slightly. Bake for 10-12 minutes or until slight cracks have formed. Cool on wire racks.
*Donna Hay says this recipe makes 16 cookies. These must be enormous cookies because I probably got 3 dozen when I did it.